How to Create a Facebook Business Manager Account for Your Facebook Page
You have created and set up a Facebook Page for your business. Step 1 completed. But have you already created a Facebook Business Manager account for that Facebook Business Page?
If not, you should. And here’s why:
Facebook Business Manager puts all your Facebook business dealings in one place. From here you can manage your ads, manage multiple Facebook Pages you might have, manage the people who do work on your Page and various other tasks.
In addition, it enables you to be focused on work as you bypass your Facebook personal page (and thereby procrastination temptation) by going straight to your business page when you log into Business Manager.
Last but not least, it keeps your Facebook Page account secure and professional. You are able manage ad accounts and product catalogs easily and able to add and remove admins, analysts and editors all without having to befriend someone through your personal profile first.
So now that you know why you should create a Facebook Business Manager account, here is the complete guide to set it up.

Creating a Facebook Business Manager Account
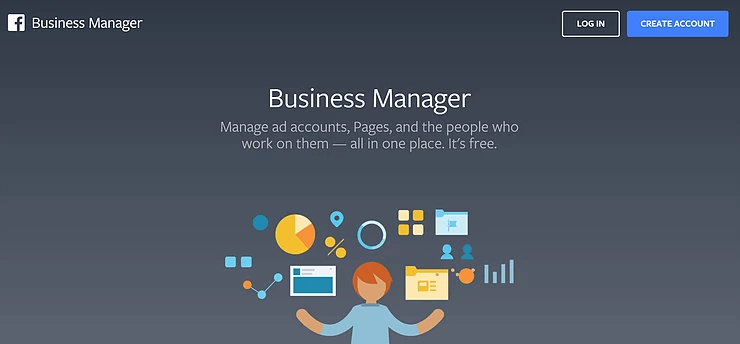
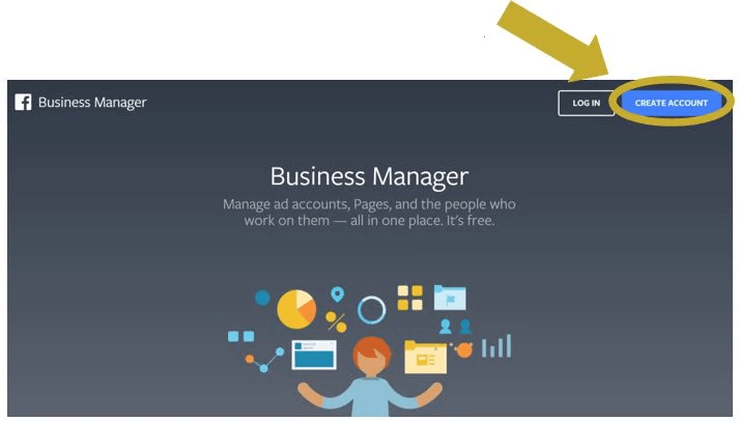
First, go to the Facebook Business Manager Website https://business.facebook.com
Next, if you have a Facebook personal profile account, click on the “Create Account” Icon in the top right hand corner of the screen of the Facebook for Business page.
If you do not yet have a Facebook personal profile account, you will need to create one, before you are able to create a Facebook Page or Facebook Business Manager Account.
If you are already logged into Facebook, you will automatically be taken to the “Create Your Facebook Business Manager Account” pop up box. (see this blog’s headline “Create Your Business Manager Account” further down)
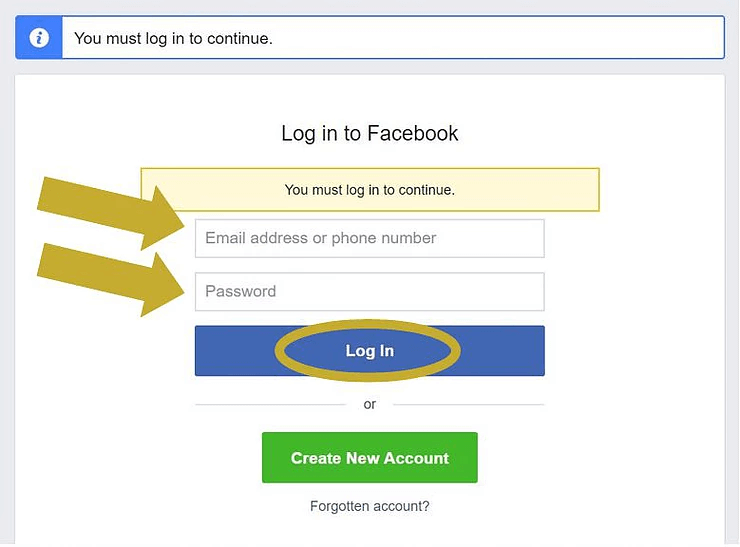
If you are not yet signed in, Facebook will now ask you to log in with your personal profile account details.
- Enter the email address and password you use to sign into your personal Facebook account (the personal account from which you created your Facebook Business Page).
- Then click on “Log In”.
You will now either land on the “Business Manager” site again and need to click on the “Create Account” link once more.

Or will be sent straight to the “Create Your Business Manager Account” pop up box.
Either way…
Next, you will be able to:
Create Your Facebook Business Manager Account
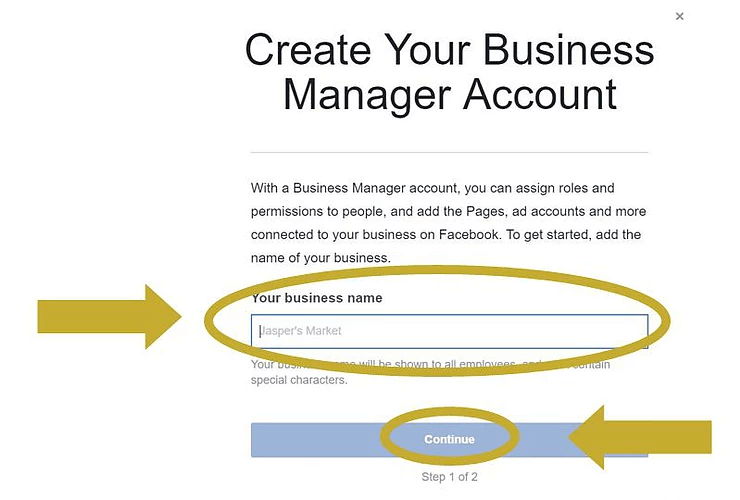
First, add your Business Name into the “Your business name” space. Then click on “Continue”.
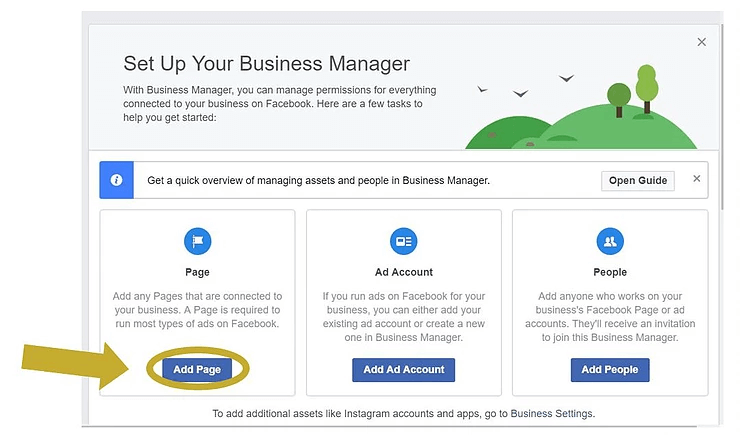
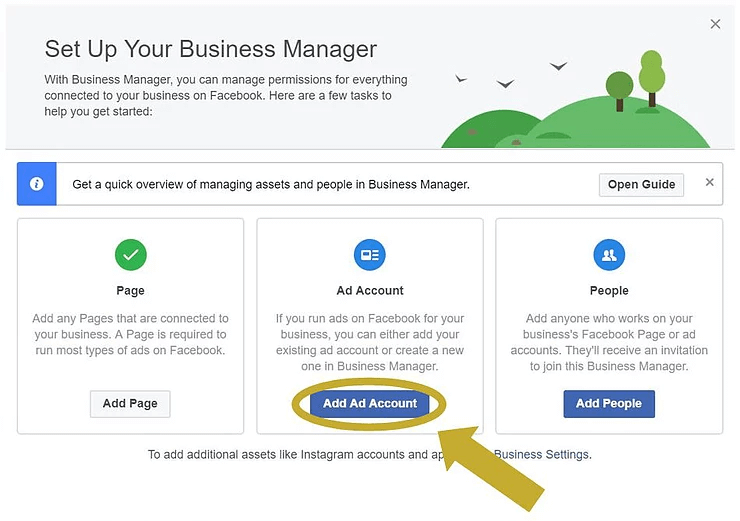
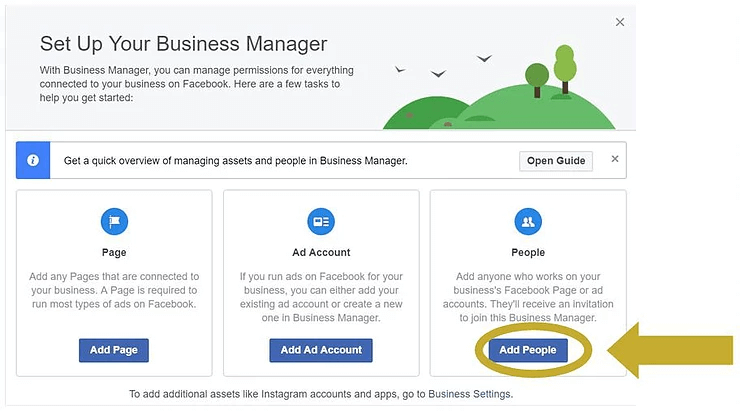
You will now land on the “Set Up Your Business Manager” Page to continue the set up process. This setup consists of three steps:
- Creating Your Page
- Setting up your ad account
- Adding any people you need to give access to the Business Manager account.
Set Up Your Business Manager
To begin, click on “Add Page” at the bottom of the “Page” column located on the left side of the page.
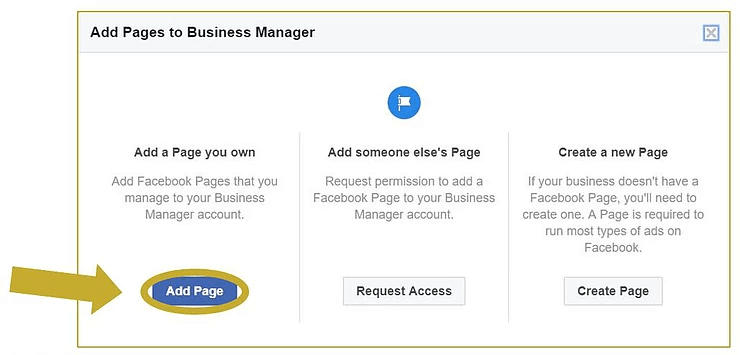
You will now have the option to either add a Page you own, request access to someone else’s Page or create a new Page.
Let’s quickly run through what each option means and for whom it applies.
- Add a Page you own – this option applies to you if you already have a Facebook Page that you own
- Add someone else’s Page – this option applies if a Page already exists but you are not the owner of the Page and you would like to request permission to add this Page to your Business Manager account
- Create a new Page – this option applies if your business doesn’t yet have a Facebook Page.
For simplicity, we will work on the premise that a Facebook Page already exists and that the person completing this “How to” is the owner of the Page.
Therefore, we will continue with the “Add a Page you own” option.
Click “Add Page” in the “Add a Page you own” column on the left hand side of the screen.
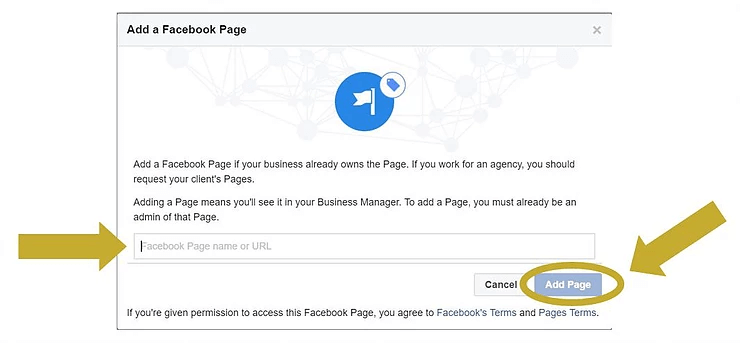
In the “Add a Facebook Page” box that appears next, add your Facebook Page name in the box provided.
A drop down box with your Page name will then appear.
Click on your Page in the drop down list. Then click “Add Page”.
Once you have clicked on your Page, if you own the Page, you will automatically be approved and the following information box will appear:
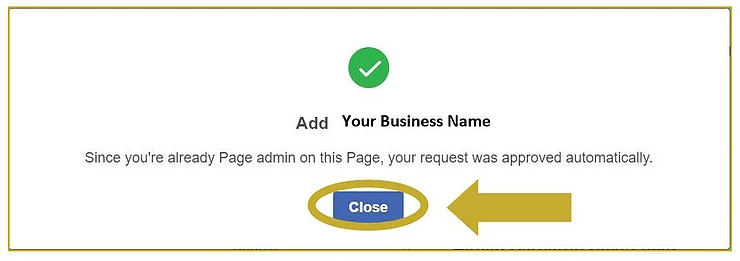
Click on the “Close” icon.
Note: If you do not own the Page, the Page owner will be notified and will have to approve the request before you can proceed.
Once the request has been approved, you can log in to the account again and proceed with the creation of Facebook Business Manager Account.
The next step is to
Set up your Ad Account
To do this, click on the “Add Ad Account” icon in the middle column called “Ad Account”.
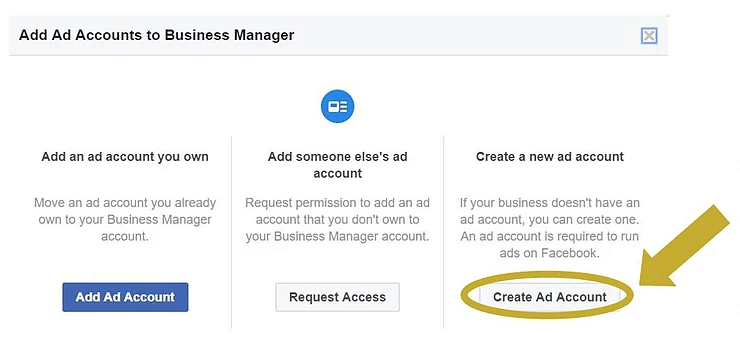
There are now three options to add an ad account. You can:
- Add an existing business ad account
- Request access to someone’s ad account or
- Create a new ad account.
As we are focusing on the creation of a Facebook Business Manager Account, we will assume nothing is yet set up and will focus here only on creating a new ad account. To do this, click on “Create Ad Account” in the “Create a new ad account” column on the right-hand side of the screen.
The following page will then appear:

Now, create your ad account by entering your Business Name in the “Ad Account Name” box.
Then ensure your business’s Facebook Business Page Name is listed in the box “Advertising on behalf of”. (see image above)
Next, set your Time Zone by using the drop down box. (see image above)
Last, choose the Currency, you will be paying in.
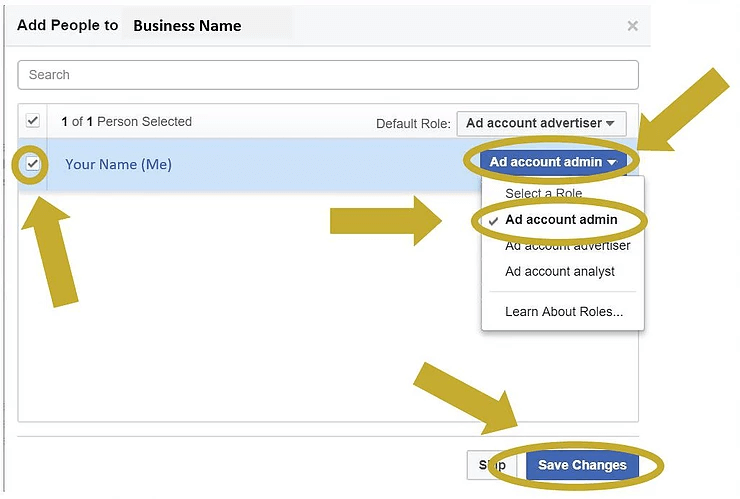
When you have completed this, click on the “Create Ad Account” button on the bottom right side of the page. Now, Facebook wants to add a manager role to the ad account. Your name will appear. (see image below)
- Ensure the box next to your name is ticked.
- Click on the drop down box “Ad account admin” (might have a different name) and choose the “Ad account admin” role for yourself.
Once you have done this, click on “Save Changes”.
For any further people from your organisation that you decide to add, ensure you keep your account safe and only grant them the minimum access they require to fulfil their role.
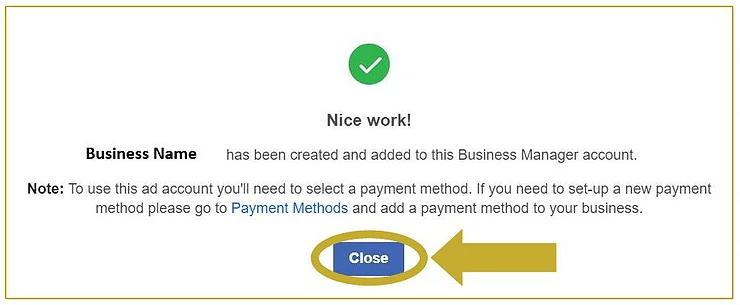
You will now receive a confirmation of the ad account creation. (see image below)
In this confirmation box you will see a link to add a Payment Method. Do not do this now. This step will come later. Simply click on the “Close” button.
Now, the next step is to
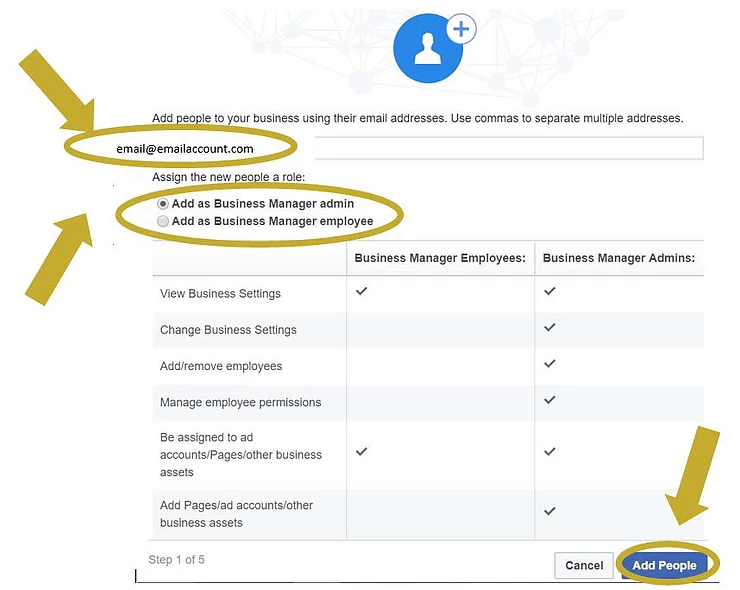
Add People to your Business Manager
In this step, you can add people, such as a Page Admin, to your Business Manager Page. To begin this process, click on “Add People”.
Now, you can add a Business Manager Admin or Business Manager Employee. What is the difference? Let me give you a short overview: What a Business Manager Admin is allowed to do:
- View Business Settings
- Change Business Settings
- Add / Remove Employees
- Manage Employee Permissions
- Be assigned to ad accounts / Pages / other business assets
- Add Pages / ad accounts / other business assets
A Business Manager Admin, as is evident above, has a lot of permissions. Therefore, only a few trusted individuals should be given this role.
Most individuals who have a role in your business’s social media should therefore be assigned as a Business Manager Employee.
What a Business Manager Employee is allowed to do:
- View Business Settings
- Be assigned to ad accounts / Pages / other business assets
In order to add a person to your account, add the email address of the person you would like to add.
Then click on either “Add as Business Manager Admin” or “Add as Business Manager Employee”, depending on which role you would like to give the individual.
Then, click on “Add People” at the bottom right of the page.
Next choose the Page you would like to create an Admin for.
Do this by ensuring the Facebook Page you want an admin for is ticked.
Then open the drop down box “Page admin” (might have a different name).
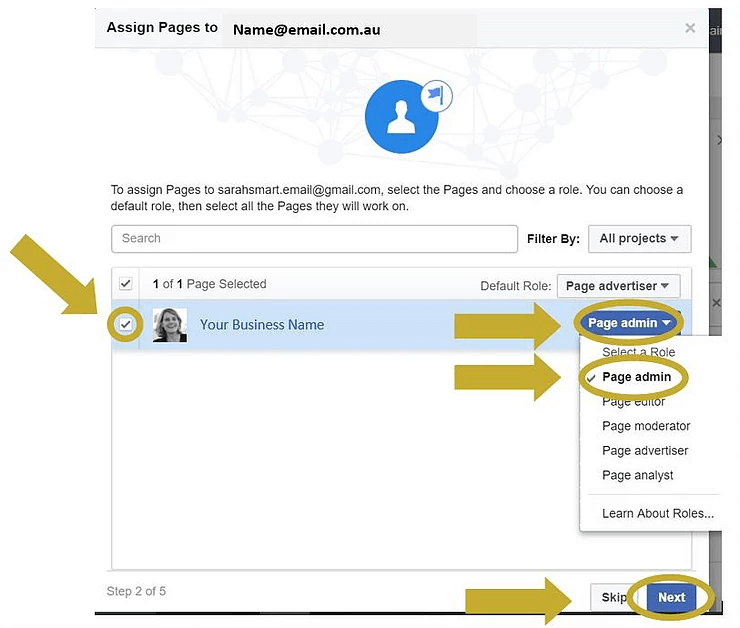
There are now several options to choose from:
- Page admin
- Page editor
- Page moderator
- Page advertiser
- Page analyst
Let’s quickly run through what each role can and can’t do.
What permissions does a Page admin have? In short, a Page admin can manage all aspects of a Page.
- Create ads
- View insights
- Assign Page roles
- Manage branded content settings
- Send messages and publish as the Page
- Respond to and delete comments on the Page
- See which admin created a post or comment
- Respond to and delete Instagram comments from the Page
- Edit Instagram account details from the Page
As with the Business Manager Admin explained above, the permissions for a Page Admin are extensive, so be wary of whom you give this role to. What permissions does a Page editor have?
- Create ads
- View insights
- Manage branded content settings
- Send messages and publish as the Page
- Respond to and delete comments on the Page
- See which admin created a post or comment
- Respond to and delete Instagram comments from the Page
- Edit Instagram account details from the Page
What permissions does a Page moderator have?
- View insights
- Create ads
- Manage branded content settings
- Send messages as the Page
- Respond to and delete comments on the Page
- See which admin created a post or comment
- Respond to Instagram comments from the Page
What permissions does a Page advertiser have?
- Create ads
- View insights
- Manage branded content settings
- See which admin created a post or comment
What permissions does a Page analyst have?
- View insights
- Manage branded content settings
- See which admin created a post or comment
Now that you know the permissions that each of the individual roles is given, choose the role you want to assign to the person you’re adding.
Once you have chosen the role, click the “Next” button on the bottom right of the screen. The next job is to assign the ad account you’d like your individual to manage.
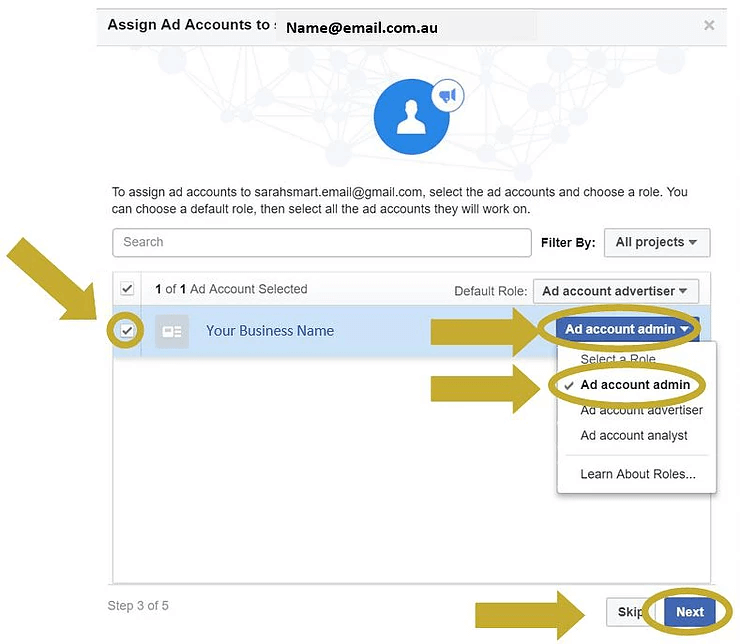
First, choose the ad account, by ensuring it is ticked.
Then assign the role the admin has on the ad account by clicking on the drop down list “Ad account admin” (might have a different name).
Then choose from the available roles.
Again, let’s quickly run through the permissions each role has. The Ad account admin has the following permissions:
(In short, to manage all aspects of campaigns.)
- Creating reports
- Viewing and editing billing details
- Assigning roles
The Ad account advertiser has the following permissions:
- See and edit ads
- Set up ads using the payment method associated with the ad account
- Cannot set account level
The Ad account analyst has only one permission:
- View ad performance
Now that you know what each role has permission to do, choose a role for the individual you are adding to the account.
Once you have done this, click on the “Next” button on the bottom of the page. You will now come to the “Assign Product Catalogs” page.
If you do not have any product catalogs to assign, you can disregard this page at this stage.
Simply click the “Skip” button on the bottom right hand of the page.
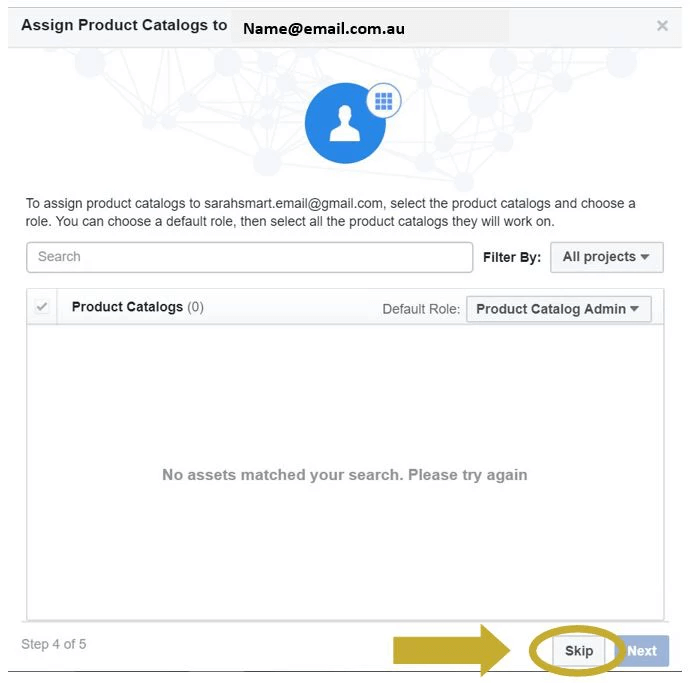
If you do have product catalogs that you would like to give an individual access to, first, ensure the relevant product catalogs are ticked.
You can then assign an individual the role of either Catalog Admin or Catalog Advertiser. Let’s quickly run through the permissions of each role.
The permissions of the Catalog Admin are:
- Add, update or delete items in the catalog
- Change catalog settings
- Create and edit product sets of this catalog to run campaigns with them
The permissions of the Catalog Advertiser are:
- Create and edit product sets of this catalog to run campaigns with them
- Cannot modify items in the catalog or change catalog settings
As a side note: you can only set up and run campaigns, when you have set up an Ad Account.
Once you have decided which role you would like to assign to which product catalogs, click on the “Next” button at the bottom of the page.
Lastly, you will receive a message confirming that you have invited someone to join your Business Page at a certain level (in the image it is at Admin level).
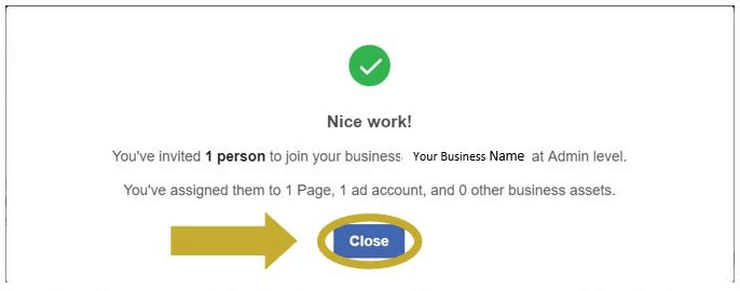
Click the “Close” button to complete this process.
Your last step is to download the Facebook “Pages Manager” app from your favourite App Store: either iTunes App Store or Android Apps on Google Play and log in.
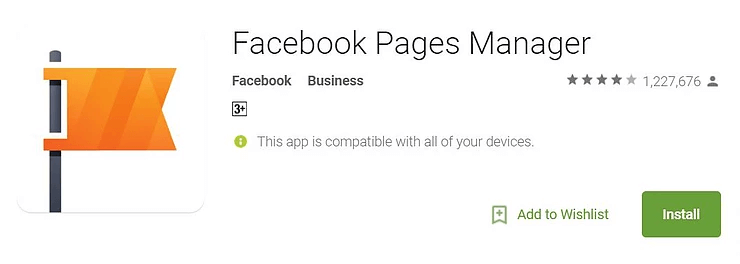
From now on, all engagement notifications on your Facebook Page will come to your “Pages Manager” app and keep personal and business nicely separated (and procrastination diversions at bay).
Congratulations! You’ve just successfully set up your Facebook Business Manager Account for your Facebook Page.
Next, you will need to set up a Payment Method for your Business Manager account.
To do this, use “How to add a Payment Method for Facebook Business Manager account“.
What are your thoughts? Do you use Business Manager? What do you like about it? What could be improved?


