How to Add a Payment Method to Facebook Business Manager
Have you set up your Facebook Business Manager Account? Great!
That will help you manage all of your business dealings on Facebook in one place, keep your accounts secure and professional as well as keep you focused.
If you still need to set up your Business Manager Account, here is Smart Engagement’s comprehensive Facebook Business Manager set up guide.
But, have you also set up your Payment Method?
You will need to have a payment method registered to your Facebook Business Manager account as well as to your individual ad accounts to be able to utilise the Facebook Ad tools.
And, even though we all wish it were different, organic reach is pretty much dead (although there are still a few things you can do to improve it).
So, you will need to use Facebook’s ad capabilities to meet those marketing goals your business has. (You have set goals for your business, haven’t you?)
So, as you want to make sure you have the ability to reach those marketing goals for this year, quarter, month or week, let’s get your payment method registered on your Facebook Business Manager account.

Set up a Payment Method
First, you will need to log into Facebook Business Manager.
There are several ways to do this, but as I work with many small businesses and business owners who are often social media novices, I will opt for the easiest way possible.
First, go to the Facebook Business Manager Website https://business.facebook.com
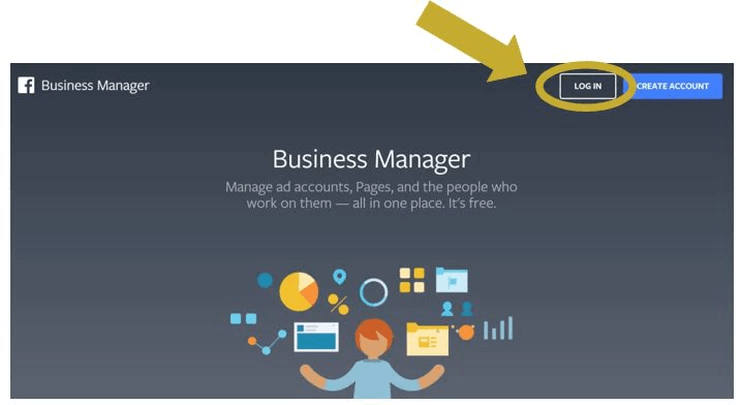
Next, if you have a Facebook Business Manager account, click on the “Log In” Icon in the top right hand corner of the screen of the Business Manager page.
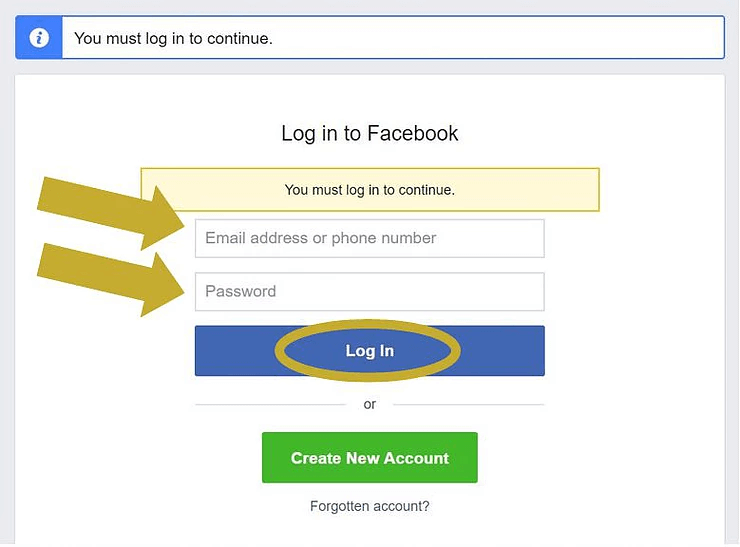
If you do not yet have a Facebook Business Manager Account, here is Smart Engagement’s step-by-step guide to create one. If you are not yet logged into Facebook, Facebook Business Manager will now ask you to log in with your Facebook Personal Profile account details.
- Enter your Facebook personal account email address and password.
- Then click on “Log In”.
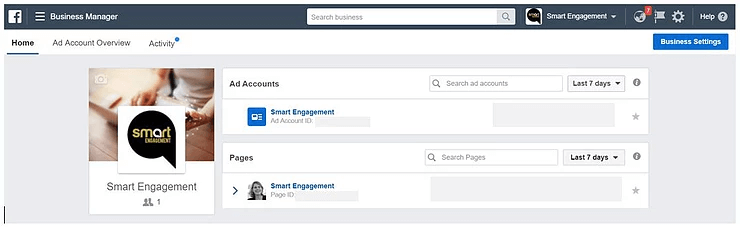
You will then land on the Facebook Business Manager home page.
If you own only one Page, your home screen should look something like this:

If you own or manage several Pages through your Facebook Business Manager, then your initial home screen will look something like this:

If this is the case, select the business you would like to set up the Payment Method for by clicking on it.
You will then land on that business’s home screen:
Next, find the “hamburger” icon on the top left of your screen. It should say “Business Manager next to it. (see image below)
When you click on it, a drop down list will appear.
In the drop down list, find the “Business Settings” link and click on it.
Note: If you do not have the “Business Settings” link under your Frequently Used items – don’t worry – keep on reading for Option 2 of how to get there.
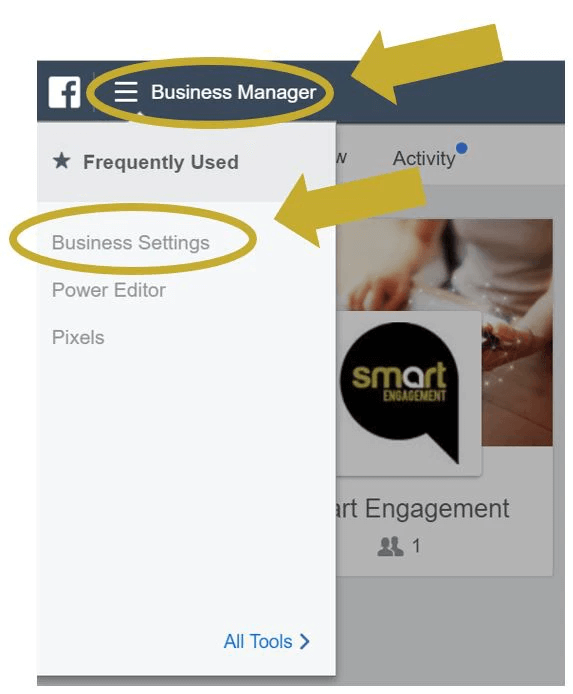
If you do not have “Business Settings” in your Frequently Used list, then simply click on “All Tools” at the bottom of the drop down list. (see image below)
The drop down list will widen to fill out the entire screen.
You will find the “Business Settings” link on the far-right of your screen under the Column “Settings”.
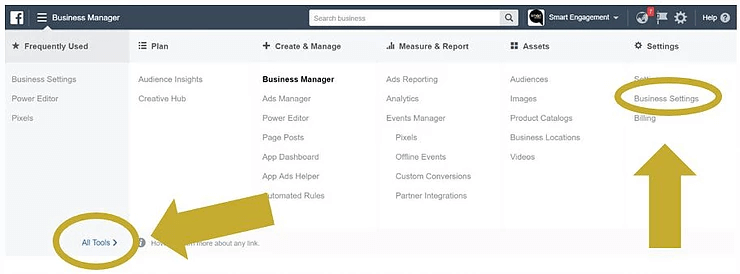
Which ever way you find and click on the “Business Settings” link, it will bring you to the following site:
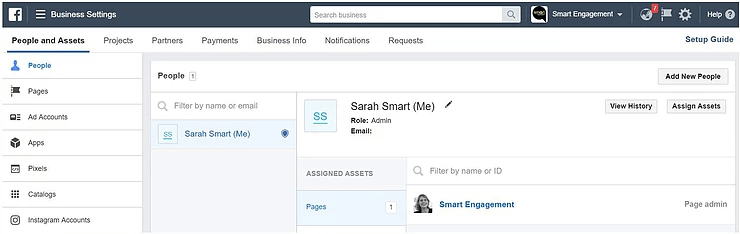
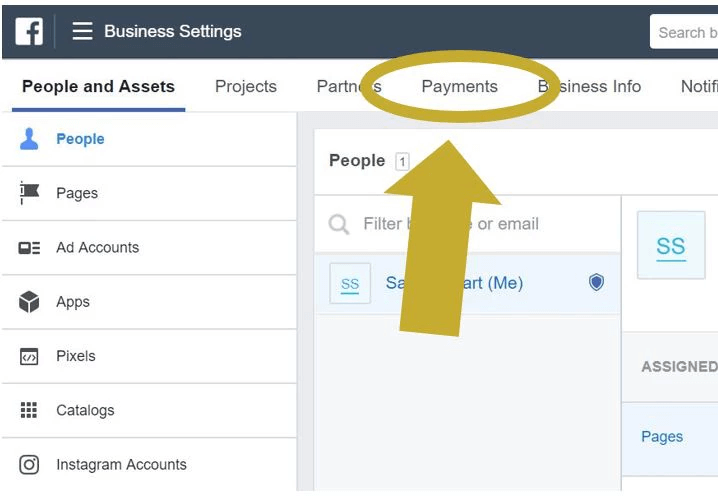
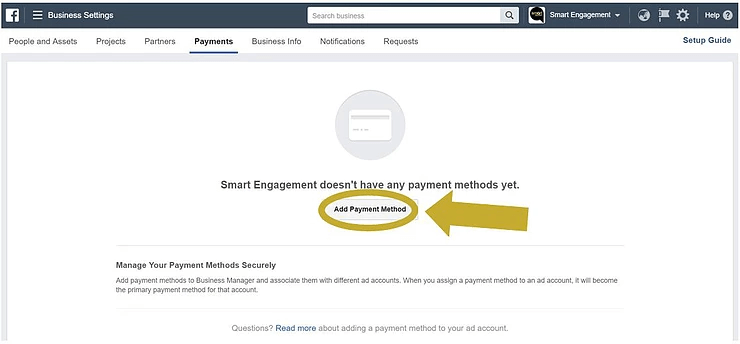
Now, find the “Payments” link on the top part of the page and click on it.
The following screen (see image below) will then appear.
Click on “Add Payment Method” to begin adding a mode of payment.
The pop up screen that come up next, will require you to enter your Credit Card Details.
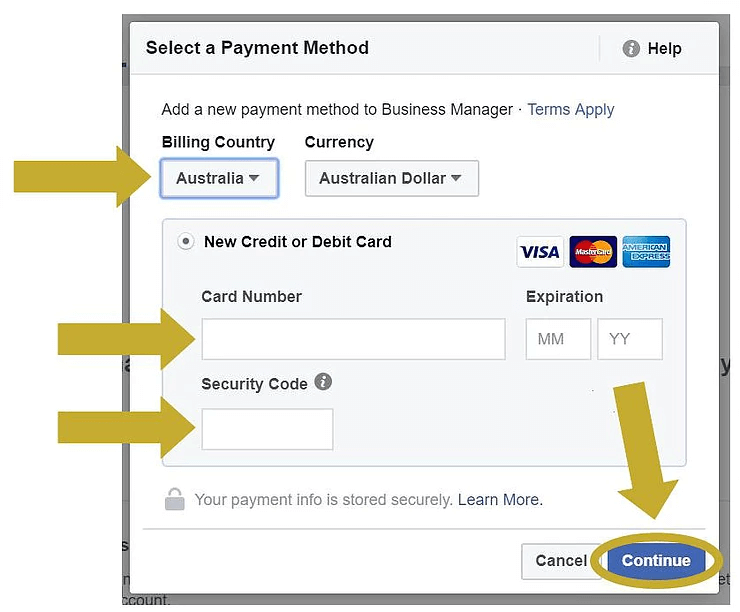
Ensure you choose the correct Billing Country and Currency.
Once you have entered the correct Card Number, Expiration Date and Security Code, click “Continue” at the bottom right of the pop up screen.
You will now come up with the following screen that will confirm that you have added a credit card to your Business Manager account.
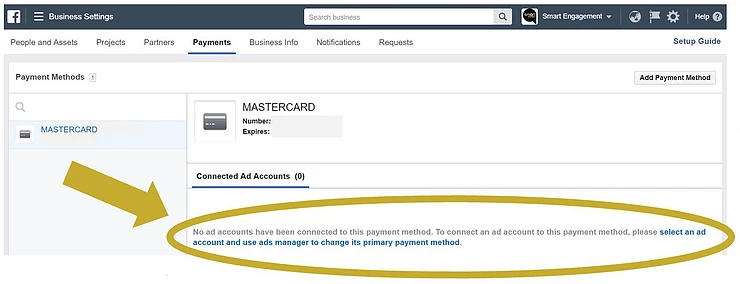
As you are setting up a new payment method, under the heading “Connected Ad Accounts”, you will see the notice that “no ad accounts have been connected to this payment method”.
Click on the blue text “select an ad account and use ads manager to change its primary payment method” to add an ad account to this payment method.
When you have clicked on the blue text (see image above), you will land on the People and Assets > Ad Accounts page (see image below).
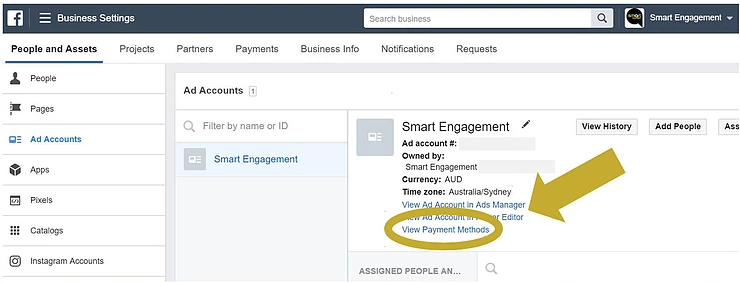
Here, under your Ad Account details, you will find three choices:
- View Ad Account in Ads Manager
- View Ad Account in Power Editor
- View Payment Methods
Of those three, click on the “View Payment Methods” link in the middle of your page. (see image above)
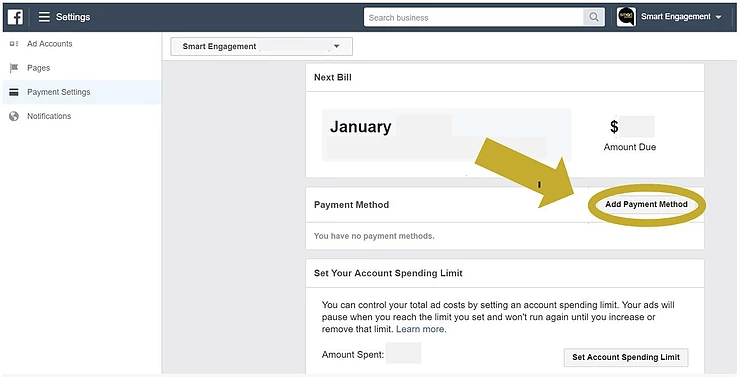
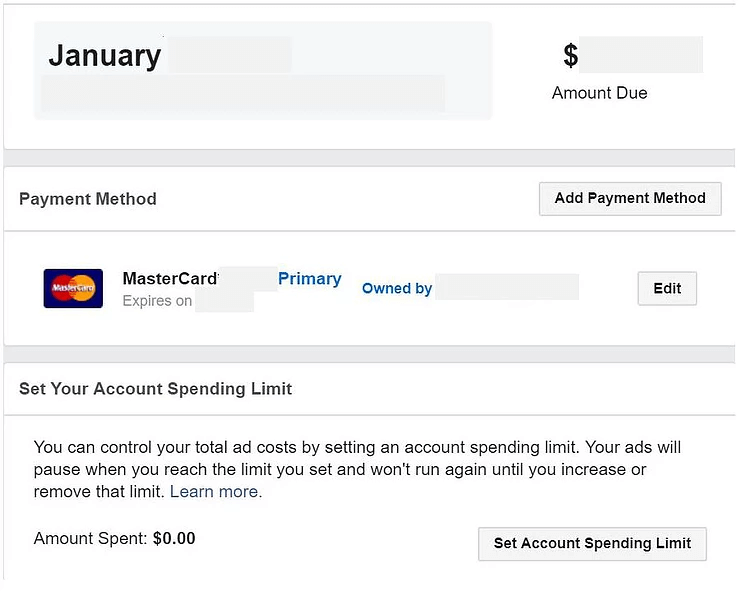
The next page that will come up, will show you when your next bill is due and for which amount. It will also allow you to:
- Add a Payment Method and
- Set an Account Spending Limit
First, let’s add a Payment Method to the Ad Account you have set up.
To do this, click on the “Add Payment Method” button.
This will open up another pop up box, which will give you the following options:
- Adding a new Credit or Debit Card
- Add a PayPal account
- Add a Payment Method from Business Manager
- Add a Facebook Ad Coupon
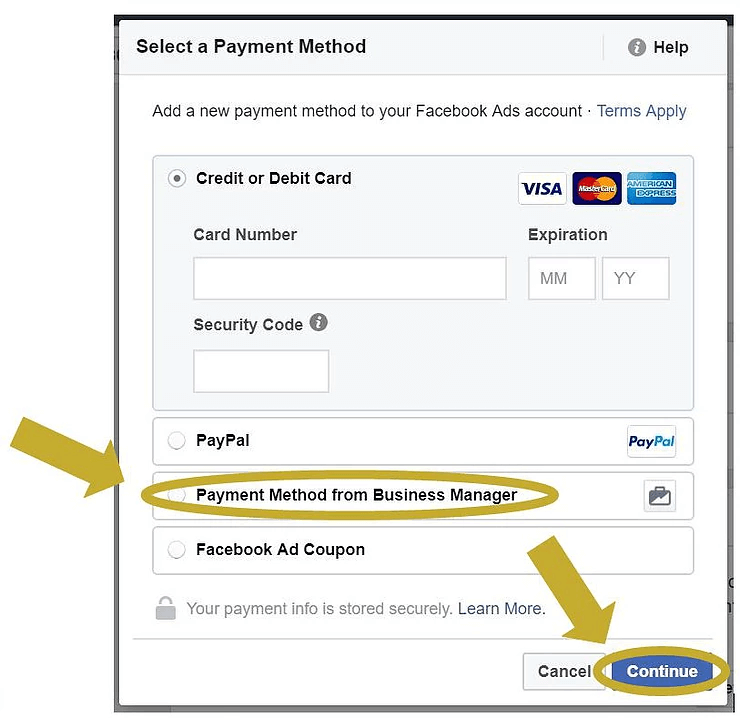
As you have already set up your payment method, choose the “Payment Method from Business Manager 18” option by clicking on the circle.
Then click “Continue”.
The pop up screen will then slightly change its look and display like this:
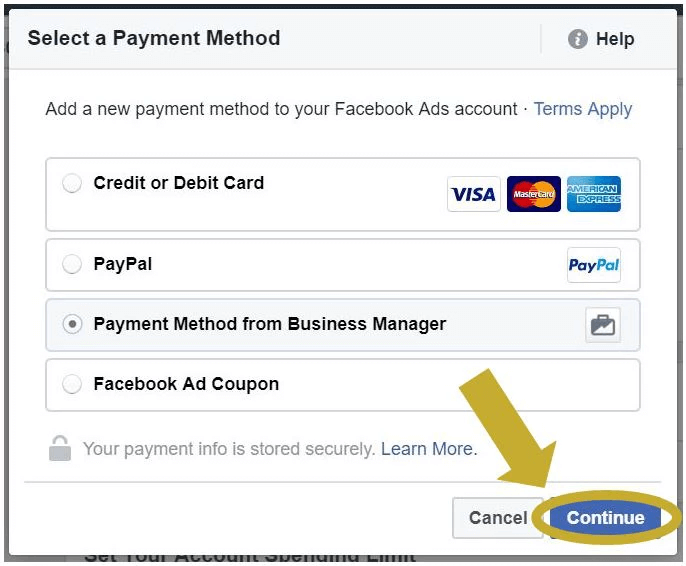
Simply click on “Continue”.
You will then be asked to confirm the Payment Method from Business Manager.
As you have only just setup your Payment Method, there should be only one option on file.
If, however, you have previously set up several Payment Methods within Business Manager, you will see those options all listed here.
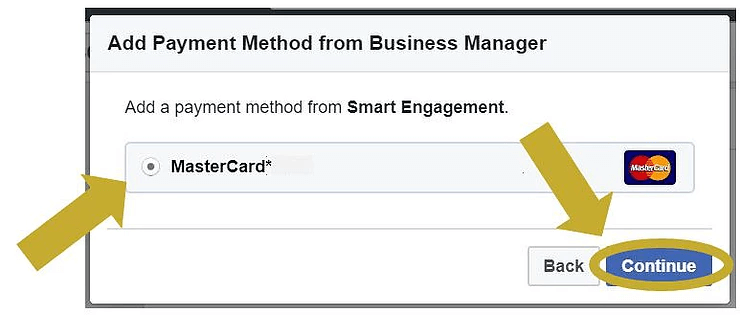
When you have chosen your preferred (or only) payment method on file, click “Continue”.
Business Manager will now ask you to verify that you would like to make this Payment Method your primary Payment Method for the chosen ad account.
To confirm, click on “Make Primary” in the lower right-hand side of the pop up box.

Facebook Business Manager will then bring you back to the following screen, which will now display your Primary Payment Method:
Theoretically, you could finish your Payment Method set up here.
However, I highly recommend you do not.
Why?
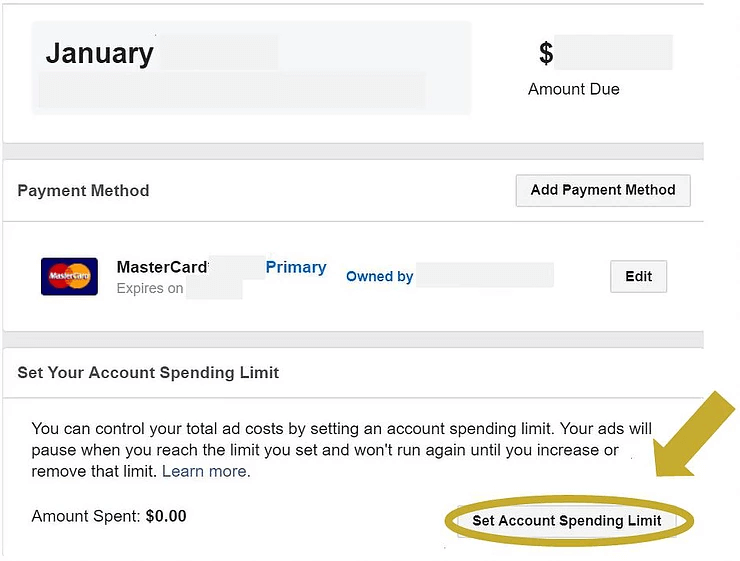
As you will see in the image above, there is another step Facebook offers: “Set Account Spending Limit”.
What does this option do? It means that if you put up an ad on Facebook and the ad exceeds expectations, you could end up paying a lot of money you hadn’t budgeted for.
Setting an an account spending limit is therefore a good idea – especially if you are a small business with a limited marketing and advertising budget and you are new to Facebook Advertising.
So, let’s look at how to set a spending limit for the ad account.
First, click on “Set Account Spending Limit” on the bottom part of the screen.
Next, you will be asked to enter the spending limit you would like to have on your ad account.
Clients often ask me: “How much should I put here?”
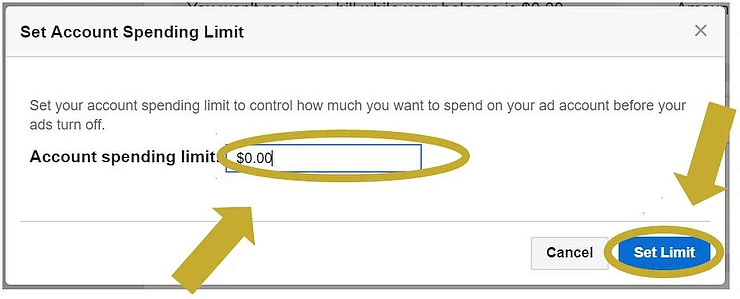
This is a question that is difficult to answer as it depends on various factors, the two main ones being your budget and your goals.
When starting out, choose an amount that you feel comfortable with “losing”. When I say “lose”, I don’t mean that it will be completely wasted money, but while you are still trying to figure out how Facebook Ads works, how to implement split testing, etc., just keep it to an amount you are comfortable with and go from there.
So once you have decided on an amount, enter it and then click on “Set Limit”.
You will now be returned to the Payment home screen, where you will now see your new “Current Limit” under the heading “Set Your Account Spending Limit”.
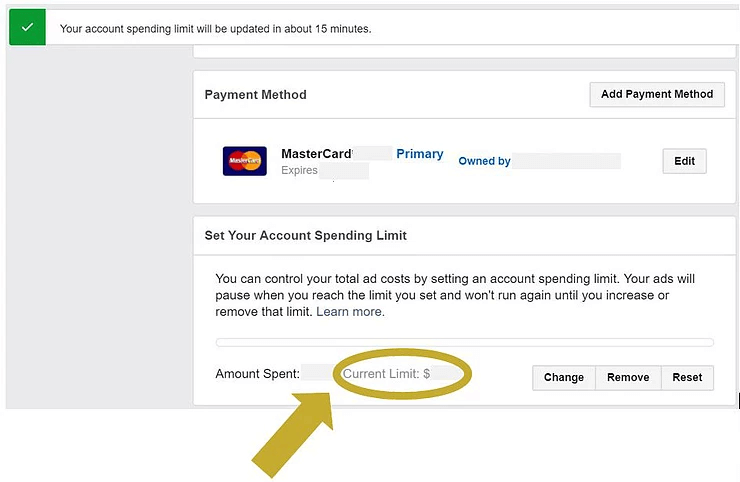
Congratulations! You have now completed a basic Payment Method set up for your Facebook Business Manager account.
As always, there is more that you could do, but this will give you a basic set up you can begin to work with.
If you’re wanting to add more admins, managers, etc. to your Facebook Page, then you can use Smart Engagement’s comprehensive step-by-step guide on “How to add an Admin to a Facebook Page through Business Manager“.
What are your thoughts? Do you have any specific set ups you prefer for your Facebook Business Manager? What really works for you?


