How to verify your website domain for Facebook Pages and why you should do it NOW
Do you know if people not associated with your business can make changes to the website link they share about your business?
This might sound odd, but it doesn’t matter if your answer is Yes or No.
Others not associated with your business should not be able to make those changes. Full stop.
I’ll get to why in a moment.
The important information is that Facebook are implementing measures that can reduce or prevent this specific misuse of their sharing feature.
Within this misuse prevention update process, Facebook Pages are coming under the microscope.
Why does this matter to you, your small business and your Facebook Business Page you ask?
And what does all this have to do with domain verification? And what is domain verification anyway? And…
Okay. Let’s start at the very beginning.

Timing
The reason this is important for you and your small business is that Facebook said it is closing down the ability to edit website link information. This means it will apply to you and your business’ own website link as well – you won’t be able to edit your link either.
Unless, that is, your business’ website link has been verified by Facebook.
So, it’s time to get cracking and get your business, salon, shop or store website domain verified with Facebook.
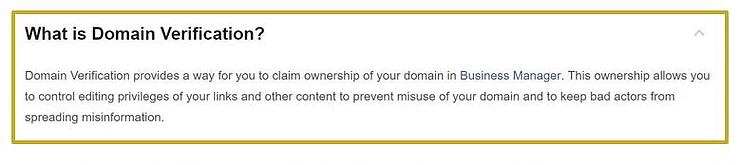
What is Domain Verification?
Domain Verification means that you have proven (=verified) to Facebook that you own a specific website (=domain). With Domain Verification, Facebook knows that the website link you are editing is legitimately yours and linked to your Facebook Business Page.
Link Editing
Now to answer the question I didn’t answer above: why no one not associated with your business should be able to edit your website link.
As you have probably heard, Facebook is looking into how certain sectors of the social media community are able to use a Facebook personal profile, a Facebook Page or Facebook Ads to manipulate, discriminate or spread false and misleading information.
One way this can be done is through publishing apps.
Publishing apps are applications that can be used to publish a post to, for example, Facebook from a publishing application other than Facebook.
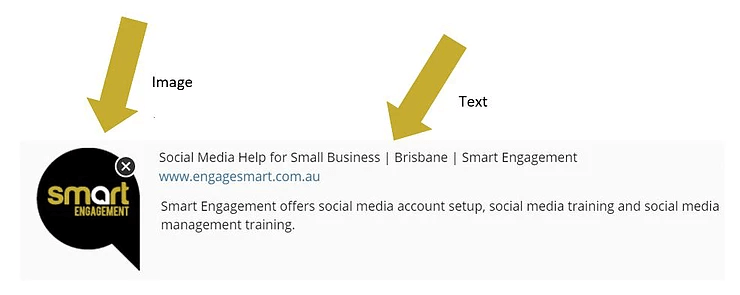
These publishing apps allow the user to change (edit) the details of the website link they will be posting. This could mean, for example, changing the image displayed for the website or the descriptive text that goes with the website.
The image below shows what I mean. On the left is the image that is displayed when a website link is created and on the right is the text that appears for the website link.

If the link is an article, the link might look like this one from Social Media Today’s Facebook Page:
Others changing parts of your small businesses’ website link information before posting it means they are able to change vital aspects of your online persona! Do you want others messing with your carefully devised branding, business image, choice of keywords, specific target messages, etc.?
Definitely not!
So, instead of my logo, as above, someone could add a different logo:
But of course that example is a harmless change. Use your imagination and the image could be something much more sinister.
Just think of what can be done with your text….
Yes, you guessed right: your descriptive text can currently be changed as well.
In the hands of someone who wants to do your business harm, this tool could be very unpleasant for your business.
Hence, Facebook is ending the ability to change elements of website links for all people – unless you have verified the website is one you own.
In-between Summary
Now you know what can be done with a domain link in someone else’s hands.
You also understand why you don’t want this to happen to your website link.
And you realise time is running out.
You now also know what you can do about it:
The answer is domain verification or, in Facebook Speak: “ownership [which] allows you to control editing privileges of your links and other content to prevent misuse of your domain and to keep bad actors from spreading misinformation.” (Facebook Developers Page)
So let’s start with our step-by-step “How to” …
Verify your Domain on your Facebook Business Page
Facebook wants to ensure that the information in a link posted on their platform is genuine, accurate, correct and comes from the verified source (your business).
This means ensuring that only the people who own or manage a specific website domain are able to edit the link before posting it on Facebook.
The way to ensure this is to verify your business’ website domain with Facebook and Smart Engagement have a step by step guide for you here.
So persevere and don’t be put off by a bit of tech talk!
With the help of this how to and possibly a bit of help from your individual domain provider, this is an update you want to be doing!
Step by Step Instructions
1. Ensure you have your Facebook Page setup through Business Manager
If you do not have your Facebook Page setup through Business Manager yet, follow the instructions in Smart Engagement’s “How to create a Facebook Business Manager account“. Then come back to this page.
2. Go to your Business Settings in Business Manager for your Facebook Business Page
If you know how to do this, simply by-pass this step and scroll down to Step 3.
If not, here is a step-by-step guide:
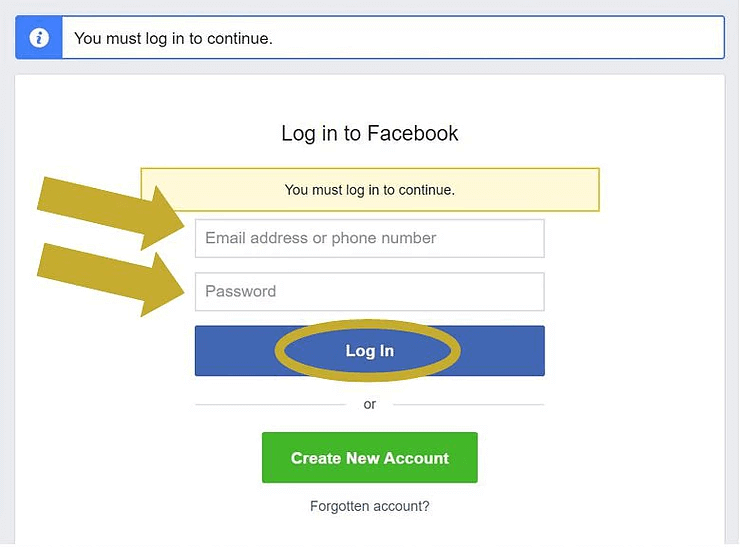
First, you will need to log into Facebook Business Manager.
There are several ways to do this, but as I work with many small businesses and business owners who are often social media novices, I will opt for the easiest way possible.
First, go to the Facebook Business Manager Website https://business.facebook.com
Next, if you have a Facebook Business Manager account, click on the “Log In” Icon in the top right hand corner of the screen of the Business Manager page.

If you are not yet logged into Facebook, Facebook Business Manager will now ask you to log in with your Facebook Personal Profile account details.
- Enter your Facebook personal account email address and password.
- Then click on “Log In”.

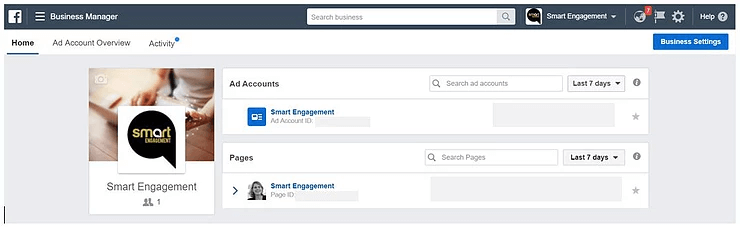
You will then land on the Facebook Business Manager home page.
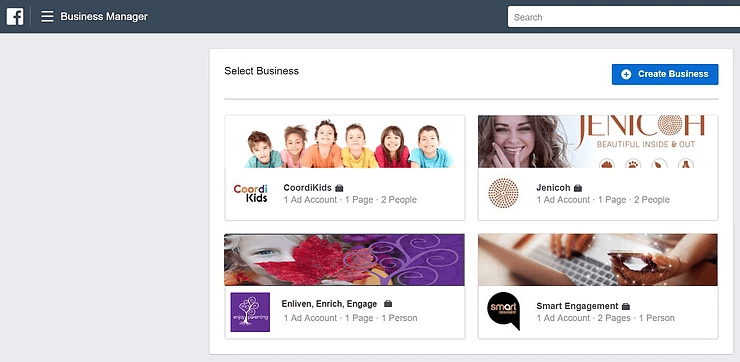
If you own only one Page, your home screen should look something like this:

If you own or manage several Pages through your Facebook Business Manager, then your initial home screen will look something like this:
If this is the case, select the business you would like to set up the Payment Method for by clicking on it.
You will then land on that business’s home screen:
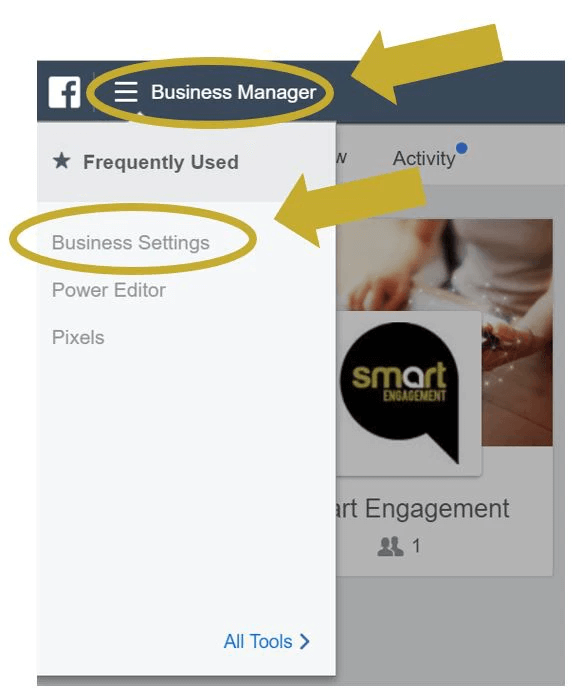
Next, find the “hamburger” icon on the top left of your screen. It should say “Business Manager next to it. (see image below)
When you click on it, a drop down list will appear.
In the drop down list, find the “Business Settings” link and click on it.
Note: If you do not have the “Business Settings” link under your Frequently Used items – don’t worry – keep on reading for Option 2 of how to get there.
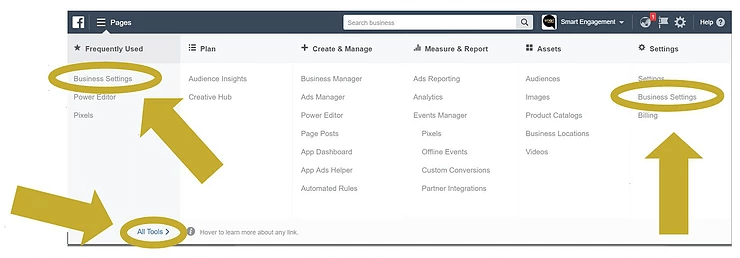
If you do not have “Business Settings” in your Frequently Used list, then simply click on “All Tools” at the bottom of the drop down list. (see image below)
The drop down list will widen to fill out the entire screen.
You will find the “Business Settings” link on the far-right of your screen under the Column “Settings”.
Which ever way you find and click on the “Business Settings” link, it will bring you to the following site:
You are now ready to get started on the Domain Verification Steps.
3. Facebook Domain Verification
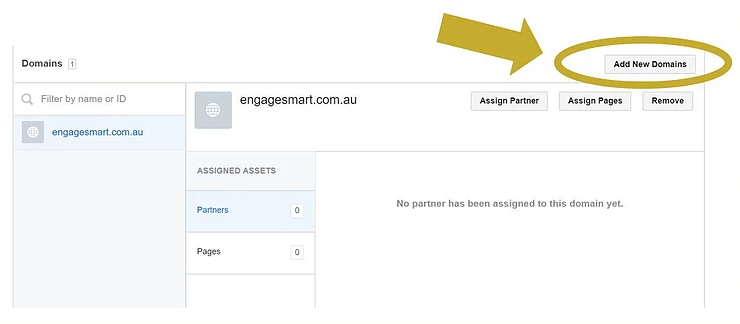
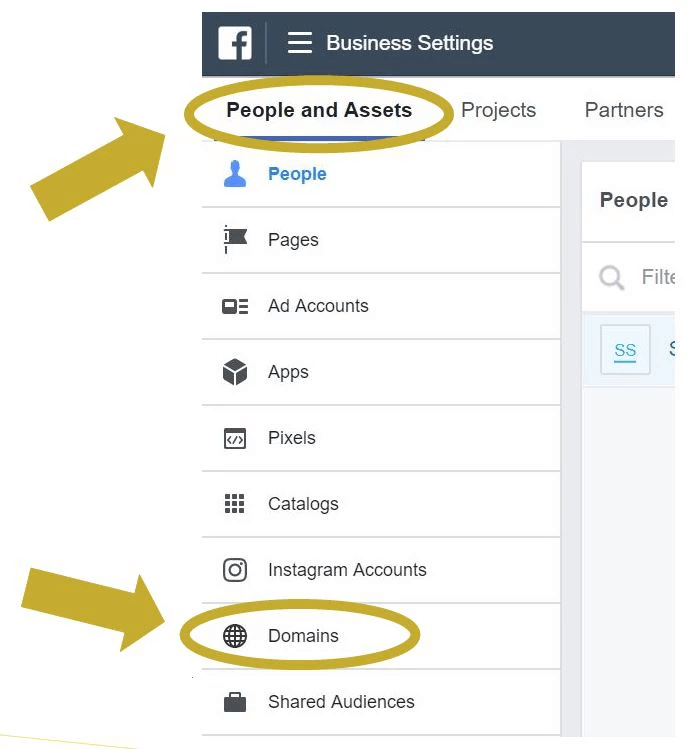
When you land on your Business Settings page, make sure you are in the “People and Assets” Tab.
Under the “People and Assets” Tab, you will find the “Domains” Tab (see image above). Click on it.
The page that comes up next will look like the image below.
Here, click on “Add New Domains” in the top right-hand corner.
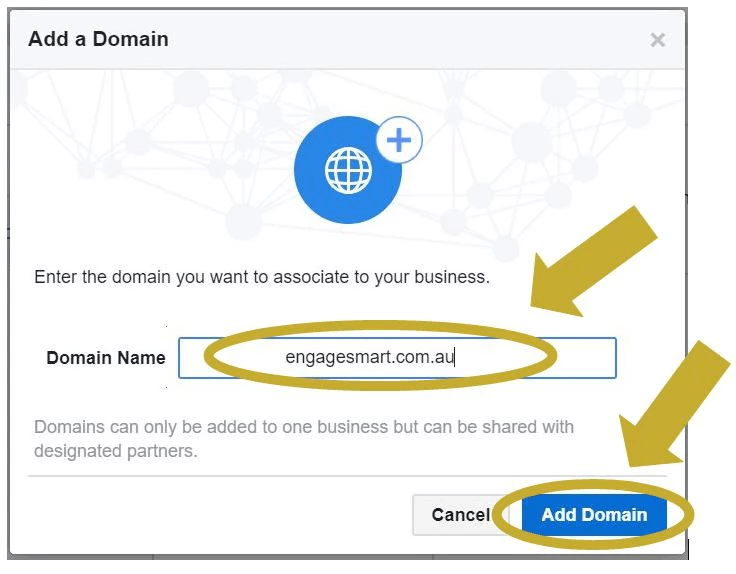
You will now be asked to enter your business’ website domain name, for example: yourbusinessname.com. Note that you have to leave out – do not type – the “https” or “www”.
After you have entered this information, click the “Add Domain” button at the bottom right.
The next page will then tell you the following information:
- The website you are registering as your business website
- Your Verification code
- Your Verification Status, which will read “Not verified”
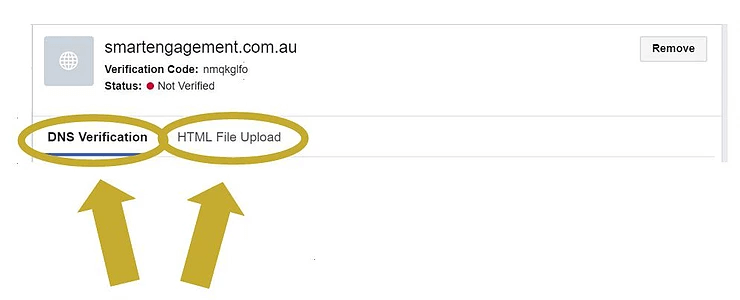
- It will also give you the option to verify your website using either DNS verification or HTML file upload

4. Setting up Domain Verification on your website domain page
As I said in the beginning, don’t be put off by the small bit of tech talk in this section. You don’t need to fully understand the terminology to do this.
So there are two ways to verify: DNS Verification and HTML file upload. My preference for Domain Verification is the DNS Verification method. It just works easier for my website setup. But I will explain both methods as you will need to see which method works better on your website. But remember, you will only need to use one method.
So, let’s begin with the DNS (Domain Name System) Verification method.
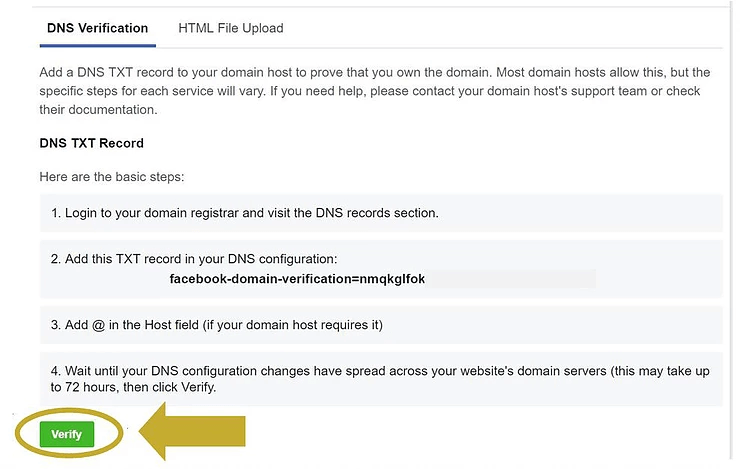
The DNS Verification Method
This method works by adding a DNS TXT record to your domain host.
In plain English a TXT record helps connect a random piece of text with a specific host, in this case the host is the company you are using to host your website, e.g. GoDaddy, Wix, etc.
Adding a DNS TXT record to your domain host proves that you own the domain.
Most domain hosts will allow this, but the specific steps for each service can be slightly different.
If you do need more specific help with any of the below information, you should contact your domain host’s help desk or refer to their help documentation.
First click on the DNS Verification Tab you can see. The following screen will appear:
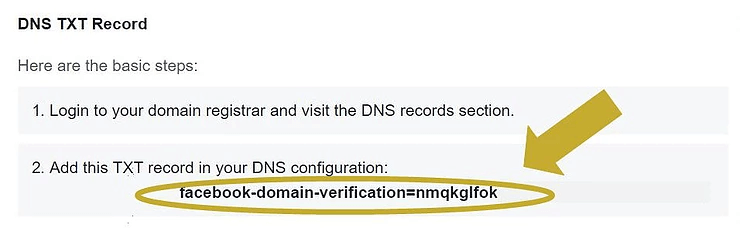
If someone has created or is managing your website for you, simply copy paste the TXT record that Facebook has created and which is listed under number 2 on your Facebook DNS Verification Page (see image below) into an email to them and ask them to add it to your website’s DNS records section. (If they are worth their salt, they should know how to do this.) 😉
Once your website manager has confirmed they have done this, go back to the Facebook Domain Verification Page (refer to steps 2 and 3).
Follow step 3 up until you complete clicking on the “Domains” tab. You will then be back on the Verification Page.

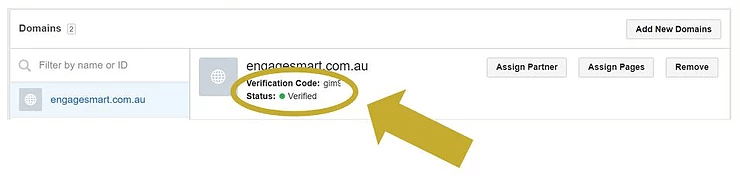
Here, click the green “Verify” button at the bottom of the page. Your Page should now appear as “Verified” in the top part of your page.
If you are managing your website yourself, here is what you need to do:
1. Keep your Facebook Verification Page open
2. Open a new browser tab and log into your website host.
The easiest way to find where the DNS TXT records are located within your hosts website is to search for “DNS TXT record” in the search function of your website host.
Once you have located where these records are, open up the function to add a new record (how this is done in detail will depend on your host).
Go back to your Facebook Domain Verification Page and make a copy of the record listed under number 2.
Then return to the website host browser tab and paste the TXT into the new record listing and save the entry.
Give the website a few minutes to process the new entry.
Go back to your Facebook Domain Verification browser tab and click the green “Verify” button on the bottom of the webpage.
Your Page should now appear as “Verified” in the top part of your page.
If it does not, don’t worry, it can take up to 72 hours to have the verification come through.
So, simply log out, wait until 72 hours have passed and then try again.

So that was the DNS Verification Method. I hope it worked for you.
If it did, you will now continue to have the ability to edit your business’ website links when sharing them on Facebook. And – equally important – others will not.
If it did not, or your website host requires an HTML file upload, then keep reading as this next part will be of interest to you.
The HTML File Upload Method
This method works by adding an HTML verification file to your domain host.
Adding an HTML verification file to your domain host proves that you own the domain.
Most domain hosts will allow this, but the specific steps for each service can be slightly different.
If you do need more specific help with any of the below information, you should contact your domain host’s help desk or refer to their help documentation.
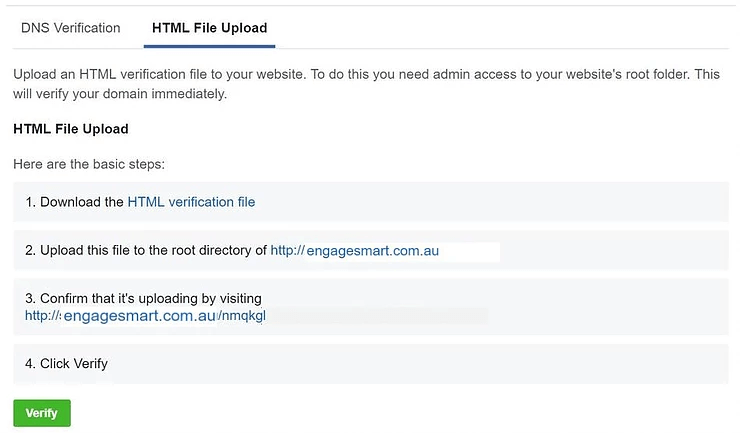
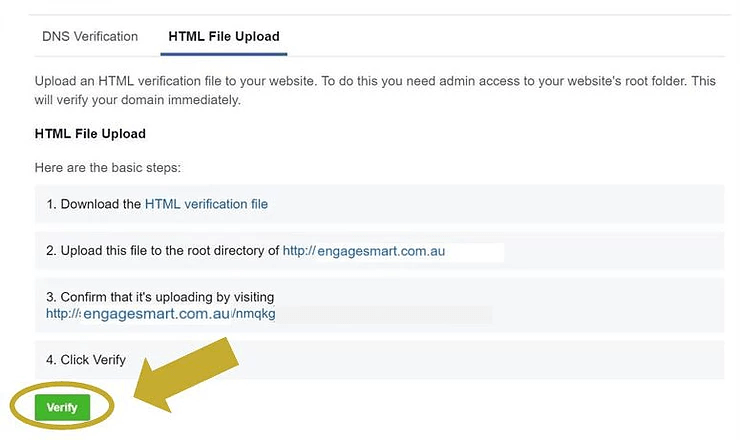
First click on the HTML File Upload Tab you can see. The following screen will appear:
If someone has created or is managing your website for you, simply download the HTML verification file that Facebook has created and which is listed under number 1 on your Facebook HTML Verification Page Tab (see image above) into an email to them and ask them to add it to your website’s root directory. (If they are worth their salt, they should know how to do this.) 😉
If you are managing your website yourself, here is what you need to do:
1. Keep your Facebook Verification Page open
2. Open a new browser tab and log into your website host.
3. Download the HTML verification file listed under point 1.

Then open up the browser tab where you have logged into your website.
The easiest way to find where the root directory is located within your hosts website is to search for “root directory” in the search function of your website host.
Once you have located where the root directory is located, upload your downloaded HTML file here. (How this is done in detail will depend on your host).
Now, open a third browser tab.
Then, return to your Facebook HTML Verification browser tab.
Here, copy the website address listed under Number 3. It will be your website address with an added code attached. So for example: http://engagesmart.com.au/abcdefghijklmnopqrstuvwxyz
Paste this website address into the third browser tab you have just opened.
Here, you will see if your HTML file is successfully uploading or has successfully uploaded.
Give the website a few minutes to process the new entry.
Once the file has successfully uploaded, go back to your Facebook Domain Verification browser tab and click the green “Verify” button on the bottom of the webpage.
So that was the HTML Verification File Method. I hope it worked for you, if the DNS Method did not.
Congratulations! You will now continue to have the ability to edit your business’ website links when sharing them on Facebook. And – equally important – others will not.
How did you go with this process? Which host provider are you with and which method worked for you? Let us know, we’d love to hear!


